


This article outlines the available options for automatically enriching measurement datasets with metadata in LOGS. Manual metadata entry is also supported for additional flexibility. The organization of metadata in LOGS is fully customizable by using custom types and fields Custom Types. We recommend to use one of our templates as a starting point (More:Customization:Templates).
Minimal metadata of a dataset in LOGS
Each measurement (dataset) in LOGS is organized within a predefined structure that supports traceability and contextualization. The following metadata fields are available by default: Minimal Dataset
- Dataset Name: Automatically set to the file name upon import.
- Creation Date: is automatically set upon import and usually reflects the acquisition date.
- Project: Used to group datasets and manage access permissions via LOGS' project-based permission system.
- Owner: By following the claiming workflow user can own datasets.
To extend metadata beyond these defaults, users can define custom dataset types. For more information, refer to the Custom Types
Metadata Mapping fills in contextual information information automatically after an upload. It can read information from a folder, experimental parameters from the file content, an owner from the file's metadata, or a fixed value you choose. It can then attach the right project, owner, sample, inventory item, custom field, or custom type to the dataset. In addition to metadata mapping you can always set default values for datasets on data source level.
Metadata Mapping concept
Think of the setup as a short three-step journey:
- Variables read information from the uploaded dataset.
- Variable mappings find the matching item in LOGS, such as a project or person.
- Rules put that information onto the dataset.
Build and test one small mapping first. Use a few representative uploaded datasets while testing, then expand the data source only after the results look right.
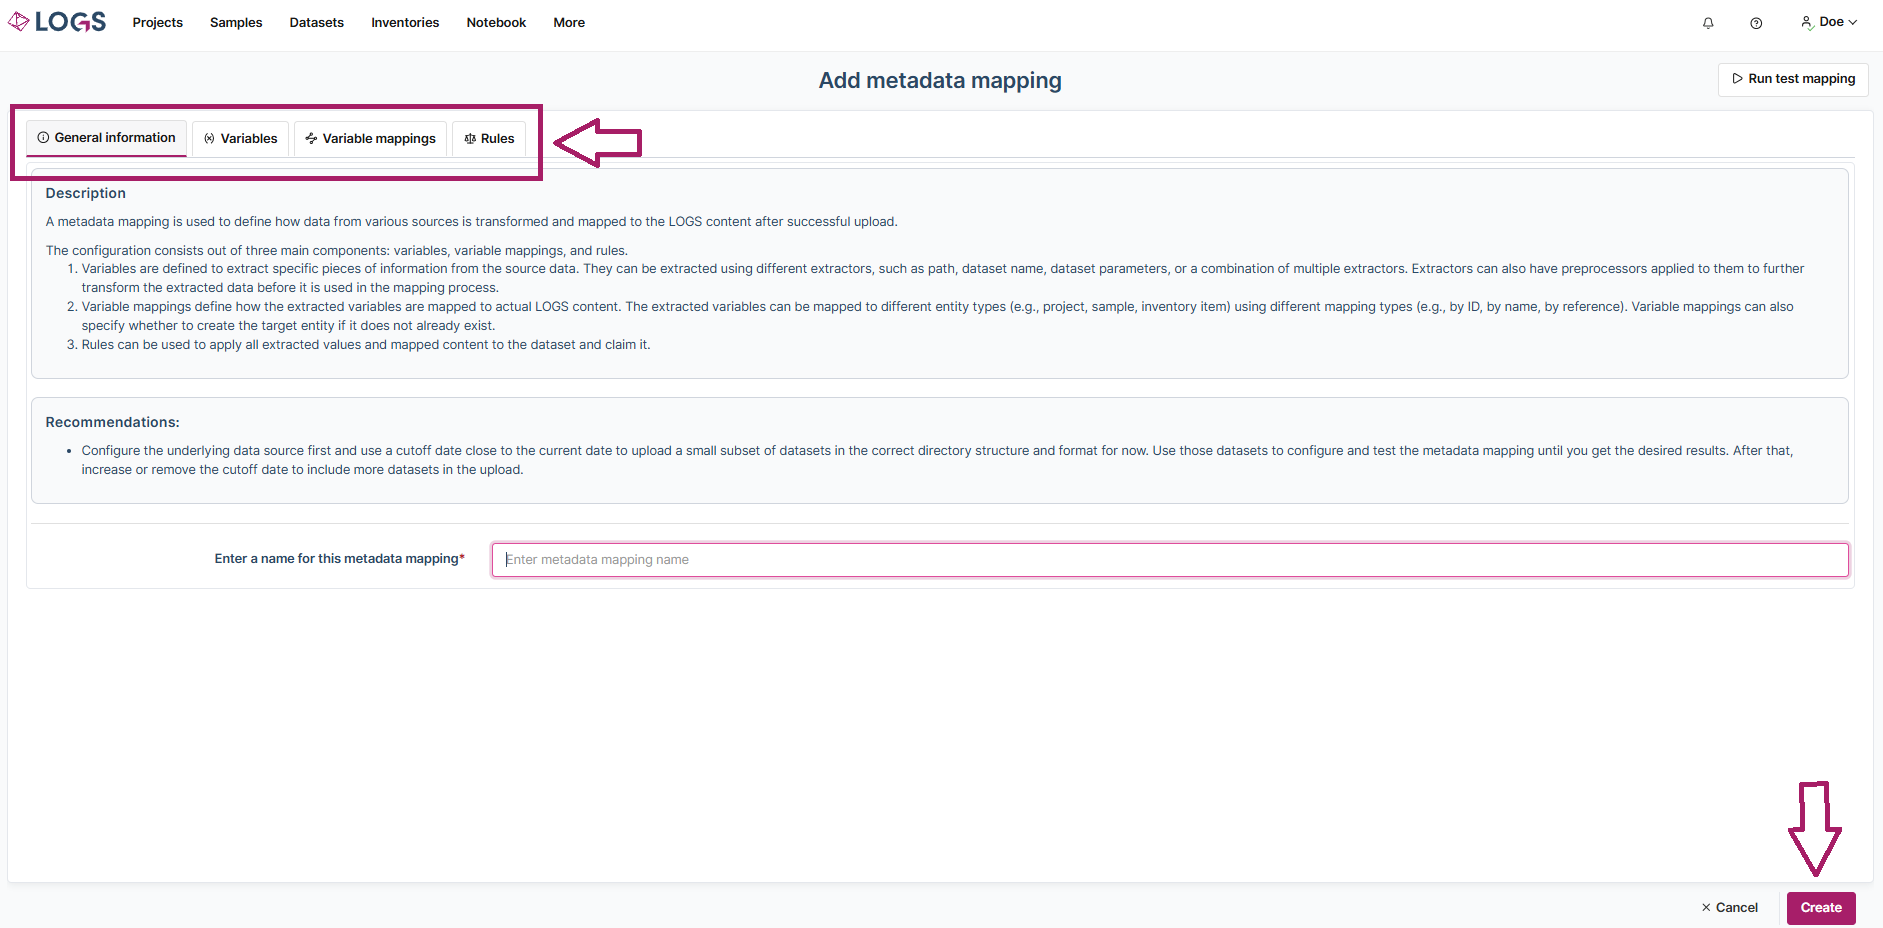
To create a metadata mapping got to More:Data import:Metadata mappings and click +New metadata mapping in the upper right corner.
Before You Begin
Give the mapping a clear Name, such as NMR uploads - project and owner. The name is for people, not for the system, so make it easy for a colleague to recognize later.
The form has separate tabs for Variables, Variable mappings, and Rules. Complete them in that order. Later steps can use values created in earlier steps.
Step 1: Read Information from the Dataset
Each variable is a named piece of information. For example, you might create variables called project_name, owner_name, or sample_code.
In the Variable field, enter a short, unique name for the value you are collecting. You will select that name later when you create mappings and rules.
Choose an Extractor Type to tell LOGS where to find the value.
Read a Folder or File Name: PATH
Use PATH when useful information is stored in the dataset location, for example in a project folder name.
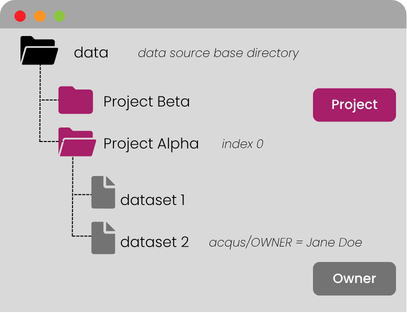
- Index chooses which part of the path to use. Counting starts at 0 just below the data source base directory.
- Reverse changes the direction of counting. With Reverse selected, 0 means the last part of the path, usually the dataset name.
For example, for /home/data_source_base_dir/folder_a/folder_b/dataset_name.example:
- Normal index 0 is folder_a; index 1 is folder_b; index 2 is dataset_name.example.
- Index -1 is the data source base directory, and -2 is the directory before it.
- With Reverse, index 0 is dataset_name.example, index 1 is folder_b, and index 2 is folder_a.
Read the Dataset Name: NAME
Use NAME when the complete dataset name is the value you need. It has no additional settings.
Read a Value from File Metadata: PARAMETERS
Use PARAMETERS to read a value supplied by the dataset's format, such as an acquisition parameter.
- Parameter is the name of the metadata value to read. Use the format Section/Parameter, for example acqus/OWNER.
- Look at an uploaded dataset to see the parameters that are actually available and copy the name exactly (case sensitive!).
Some parameters are tables rather than single values. Turn on Is table parameter only in that case. The following fields then identify the value you want:
- Key column index: the column to search, where the first column is 0.
- Key column value: the text to find in that column.
- Key column ignore case: select this when upper- and lowercase differences should not matter.
- Target column index: the column to read after the matching row is found.
- Use first occurrence: select this when more than one row may have the same key and the first matching row is acceptable. Otherwise, duplicate matches are reported as an error.
Use the Same Value Every Time: STATIC
Use STATIC for a fixed value that does not come from the uploaded dataset.
- Value is the text that every matching dataset will receive.
For example, a variable with the value NMR can consistently populate a custom field that identifies the technique.
Read Dataset Notes: NOTES
Use NOTES to use the dataset notes as the variable value. It has no additional settings.
Combine Several Values: MERGE
Use MERGE when one value needs to be made from several pieces, for example a project name, a sample code, and fixed text.
- Template describes the finished value. Use ${1}, ${2}, and so on for the groups in the order shown on the page.
- Group is one piece of the finished value. Each group has its own extractor and can be cleaned up before it is combined. A group cannot itself use MERGE.
For three groups, ${1}_${2}_staticText_${3} could produce project_sample_staticText_run.
Clean Up a Value: Preprocessors
Preprocessors are optional. Use them when the extracted text contains more than you need. They can be added to a normal variable or to an individual MERGE group.
Use ARRAY to split text and take one part:
- Split by is the separator, for example ,.
- Index chooses the part to keep, starting at 0.
For A,B,C, split by , and index 1 returns B.
Use REGEXP when a pattern is the best way to pick out text:
- Regexp is the pattern to apply.
- Group chooses the matching part, starting at 0.
For example, the pattern ([a-z]+)([0-9]+)([a-z]+) applied to abc123def returns abc for group 0, 123 for group 1, and def for group 2. This is an advanced option; use it when splitting text is not sufficient.
Step 2: Find or Create Related LOGS Items
A variable mapping turns text such as Project Alpha into the actual Project, Person, Sample, or Inventory item stored in LOGS. Give each mapping a unique Mapping variable name, such as project or owner.
Keep dependent mappings in order. A mapping can use only mappings and result values listed above it. Use the arrow controls to move a mapping when necessary.
Choose What to Find
- Entity type chooses what you are looking for: PROJECT, SAMPLE, PERSON, or INVENTORY_ITEM.
- Mapping type chooses how LOGS should identify it.
Choose BY_ID when your variable contains the item's LOGS number. Select that variable in Source variable (ID).
Choose BY_NAME when your variable contains a name, such as Project Alpha. Select it in Source variable (name). Turn on Ignore case when project alpha and Project Alpha should be treated as the same name.
Choose BY_REFERENCE when the item was already found by an earlier mapping or result value. Select that earlier item in Source variable (reference). This is useful when one mapping depends on another.
For projects, samples, and inventory items found by name, Create if not exists can create a missing item using the supplied name. It is not available for persons. Only enable it when automatic creation is intended.
Details Used When Creating an Item
These fields appear after Create if not exists is selected. They are used only for a new item; they do not change an item that already exists.
For a new project:
- Project owner selects an earlier Person mapping as the owner.
- Project permissions view selects an earlier Person mapping for view permission.
- Project custom type ID selects a variable containing the project custom type ID.
For a new sample:
- Sample project selects an earlier Project mapping.
- Sample owner selects an earlier Person mapping.
- Sample custom type ID selects a variable containing the sample custom type ID.
For a new inventory item:
- Inventory item custom type ID is required. Select a variable containing the item's custom type ID; LOGS also uses it when looking up the inventory item.
- Inventory item project selects an earlier Project mapping to associate with the item.
- Inventory item parent selects an earlier Inventory item mapping. Use it only for a hierarchical inventory type.
Use Custom fields to set initial values on a new project, sample, or inventory item. Add one row for each value:
- Custom field chooses the field to fill in.
- Custom field source variable chooses the variable that holds its value.
Reuse Information from a Found Item
Use Variables from result when a later step needs a value from an item you have just found. For example, after finding a sample, you might reuse one of its fields in a later mapping.
- Result variable key is the name you will use later.
- Value type chooses where to read it from.
- Choose FIELD_NAME and enter the exact Field name for a standard field on the item.
- Choose CUSTOM_FIELD and select the Custom field for a custom value.
You can find valid field names by looking at an existing item, the API documentation, or the custom type editor. References to other LOGS items stay usable as references; ordinary values are provided as text. Lists cannot be used here.
Step 3: Update the Dataset
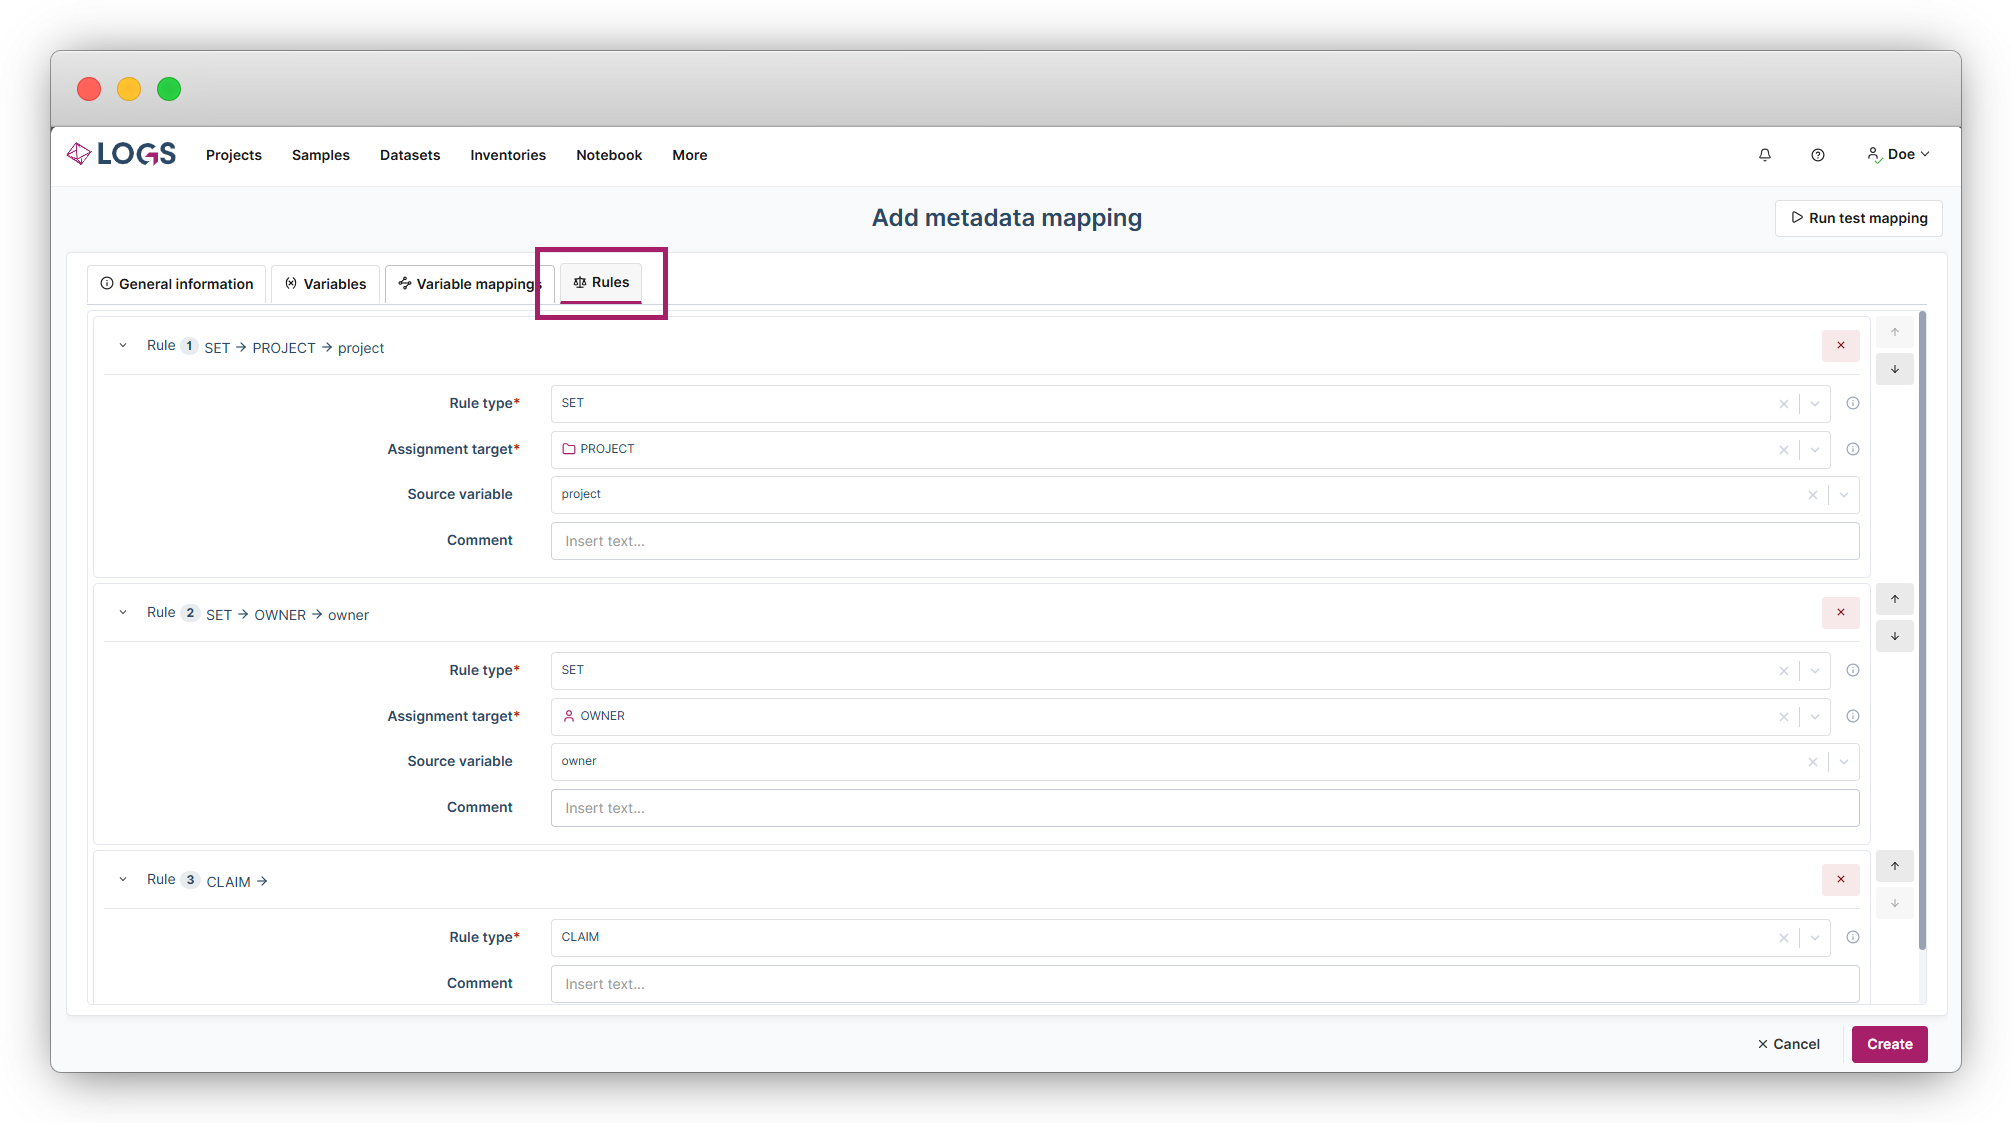
Rules decide what happens to the uploaded dataset. They run from top to bottom, so use the arrow controls if one rule must happen before another.
Choose the Action
- SET replaces the current value. Use it for owner, project, custom field, or custom type.
- ADD adds a value only when it is not already present. Use it for a project or a custom field that can hold several values.
- CLAIM claims the dataset once the required information is present. Claiming needs both an owner and at least one project. It does not use an assignment target or source variable.
Choose where the value goes
For SET and ADD, choose an Assignment target:
- OWNER sets the dataset owner.
- PROJECT sets or adds a project.
- CUSTOM_FIELDS sets or adds a value to a selected dataset custom field.
- CUSTOM_TYPE sets the dataset custom type. This option is available with SET.
Choose the value to use in Source variable. For OWNER and PROJECT, choose a Mapping variable, because those fields need a real LOGS person or project. For CUSTOM_FIELDS, you can choose an extracted variable, a Mapping variable, or a result variable.
When the target is CUSTOM_FIELDS, use Custom field to choose the dataset field to update. When the target is CUSTOM_TYPE, use Custom type to choose the dataset custom type. Comment is optional and is useful for explaining the reason for a rule to future editors.
Example
This example assigns a project and owner, then claims the dataset.
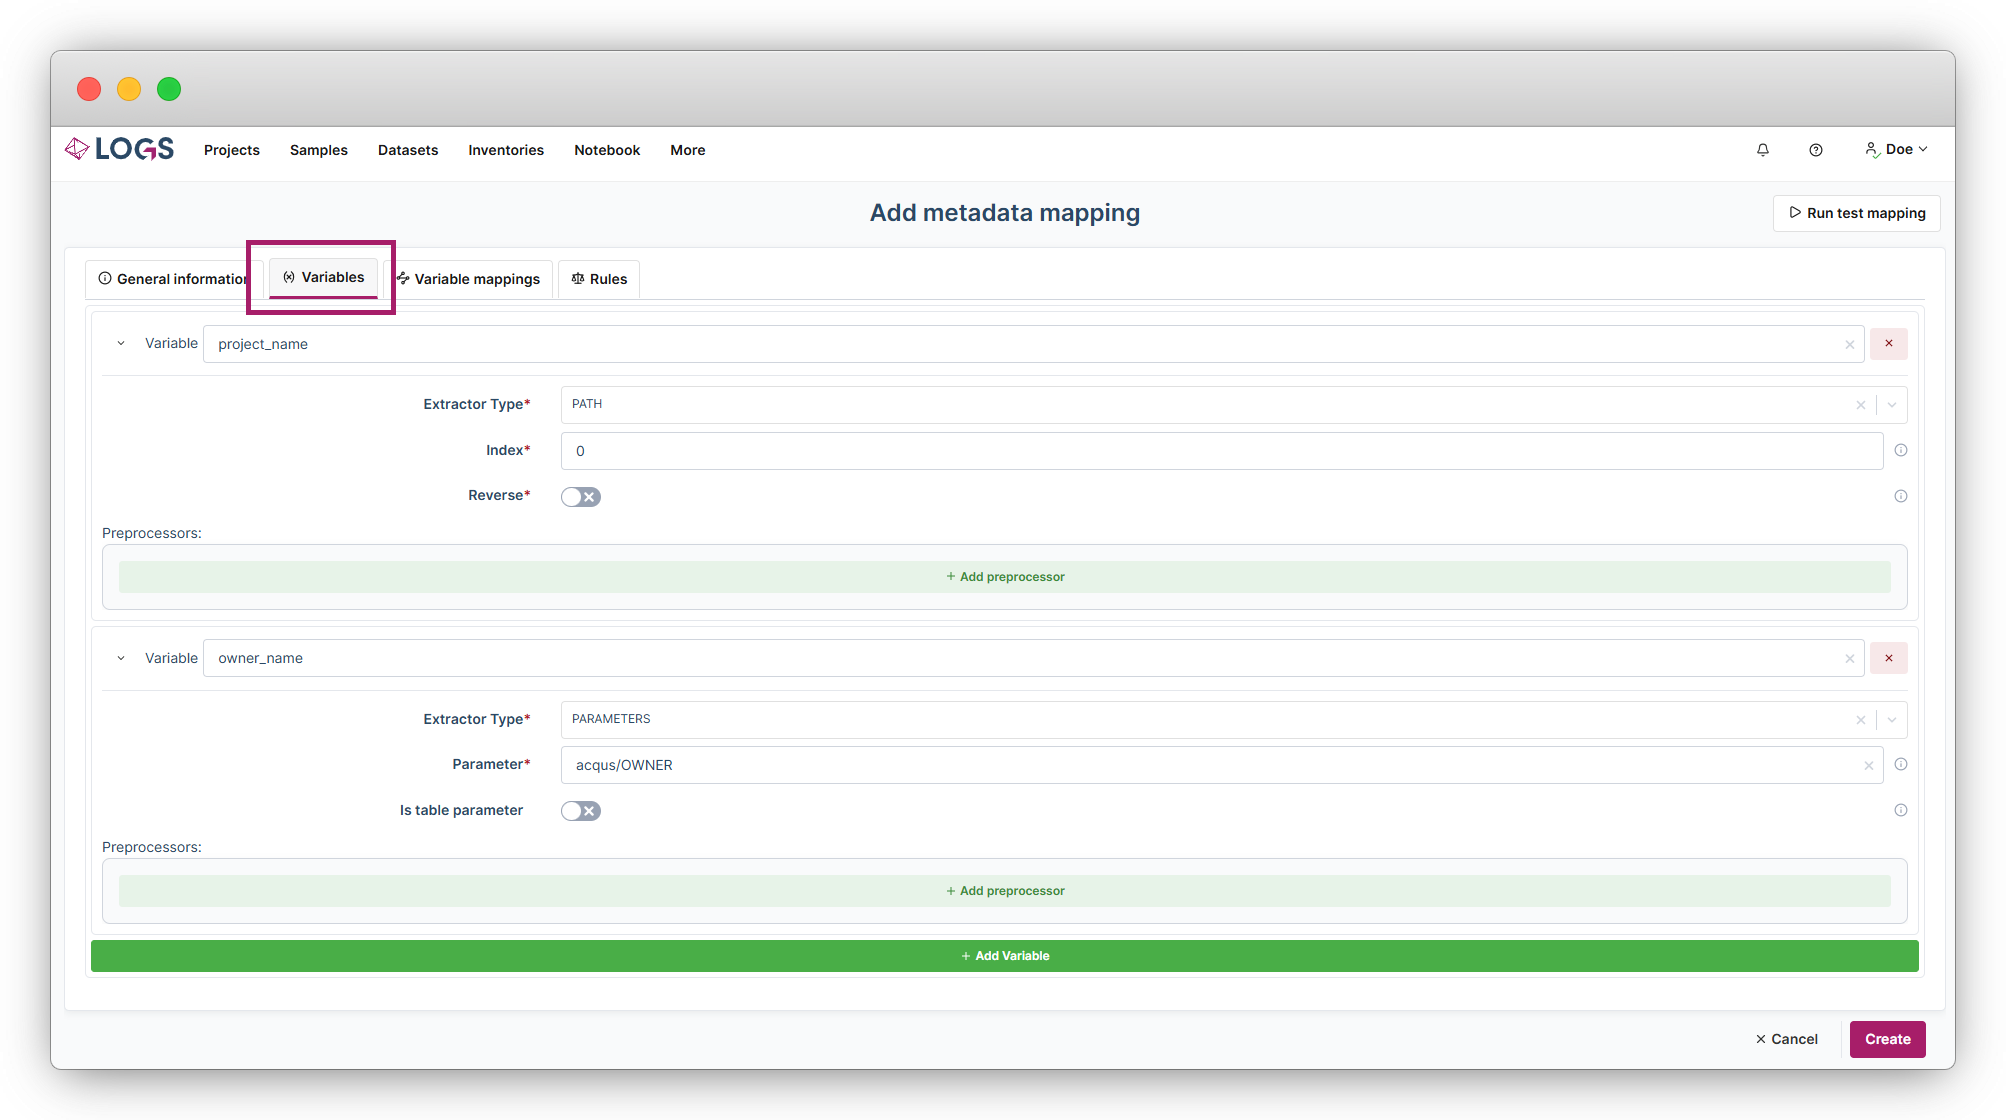
- Create a project_name variable. Choose PATH and select the index of the project folder.
- Create an owner_name variable. Choose PARAMETERS and enter acqus/OWNER.
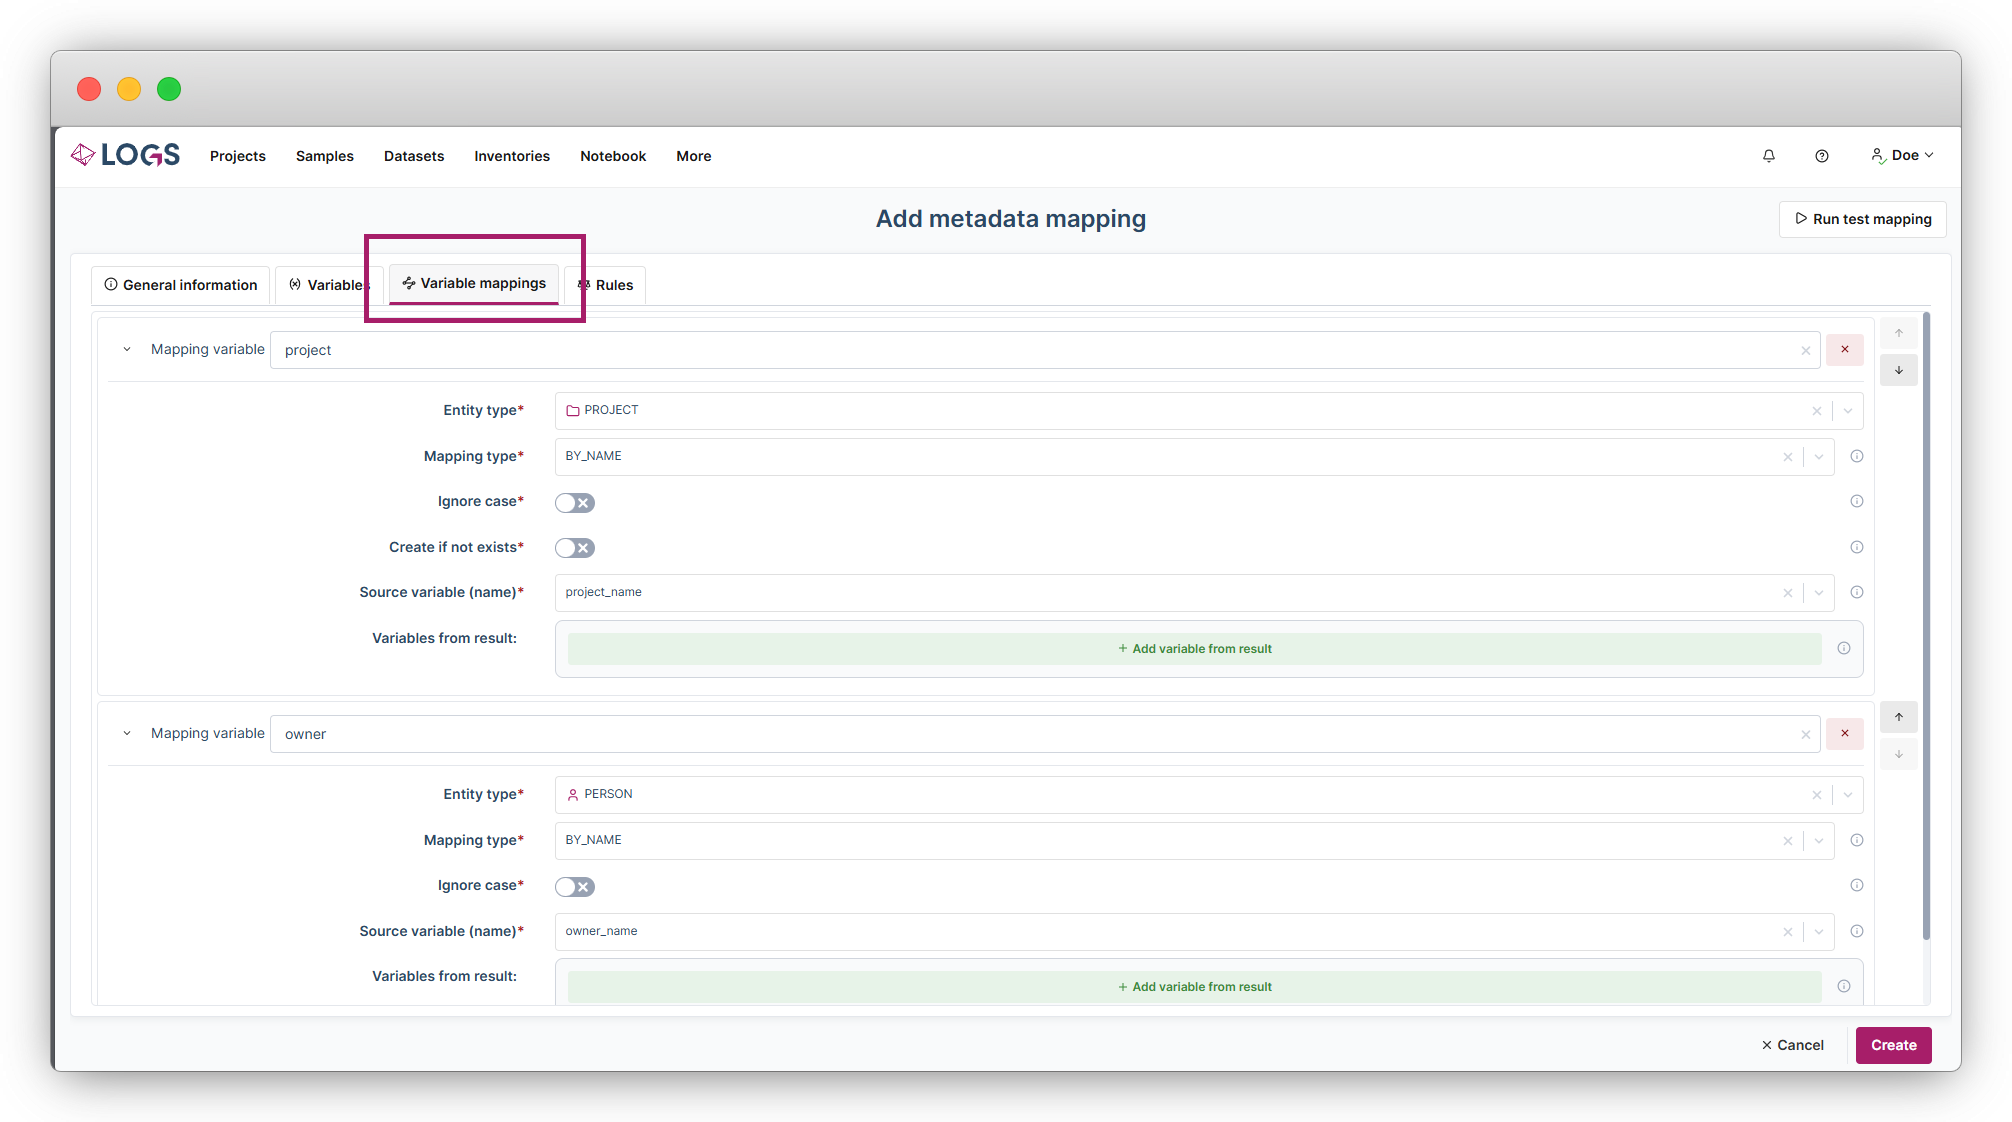
- Create a project mapping. Choose entity type PROJECT, mapping type BY_NAME, and source variable project_name.
- Create an owner mapping. Choose entity type PERSON, mapping type BY_NAME, and source variable owner_name.
- Add a SET rule with assignment target PROJECT and source variable project.
- Add a SET rule with assignment target OWNER and source variable owner.
- Add a CLAIM rule after the project and owner rules when the dataset should be claimed automatically.
- Run the mapping test with a representative dataset. Confirm the values read correctly, the project and person are the expected ones, and the dataset is updated as intended.
Final Check Before Enabling a Mapping
• The mapping has a clear name.
• Variable names and mapping variable names are unique and meaningful.
• Each variable returns the expected value in the test result.
• Dependent mappings are ordered after the values they use.
• Automatic creation is enabled only where new projects, samples, or inventory items are desired.
• Project and owner rules are present before a CLAIM rule.
• The test result matches the intended dataset metadata.

